上两章我们介绍了用webiopi实现网页控制,对网页控制也有了一定的了解。这一章我们介绍通过Python bottle实现网页控制。Bottle是一个非常小巧的微型Python web 框架。 Bottle 是一个非常小巧但高效的微型 Python Web 框架,它被设计为仅仅只有一个文件的Python模块,并且除Python标准库外,它不依赖于任何第三方模块。 - 路由(Routing):将请求映射到函数,可以创建十分优雅的 URL
- 模板(Templates):Pythonic 并且快速的 Python 内置模板引擎,同时还支持 mako, jinja2, cheetah 等第三方模板引擎
- 工具集(Utilites):快速的读取 form 数据,上传文件,访问 cookies,headers 或者其它 HTTP 相关的 metadata
- 服务器(Server):内置HTTP开发服务器,并且支持 paste, fapws3, bjoern, Google App Engine, Cherrypy 或者其它任何 WSGI HTTP 服务器
安装 Bottle 1 | sudo apt-get install python-bottle |
新建一个HelloWorld.py文件,并输入如下代码保存。 06 | @route('/helloworld/:yourwords') |
08 | return 'hello world. ' + yourwords |
10 | run(host='0.0.0.0', port=8080) |
1 | sudo python HelloWorld.py |
就会显示如下页面。(改变helloworld后面的字符串,显示也不会不一样) 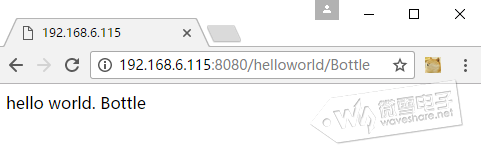
程序中用到两个Bottle组件,route()和run()函数。 route() 可以将一个函数与一个URL进行绑定,在上面的示例中,route 将 “/hello/:yourwords’ 这个URL地址绑定到了 hello(yourwords) 这个函数上. 我们获得请求后,hello() 函数返回简单的字符串. 最后,run() 函数启动服务器,并且我们设置它在 “localhost” 和 8080 端口上运行
通过Web控制RGB LED。 上面只是小试牛刀,下面再来一个酷炫的。通过网页控制RGB 彩灯,下面以RGB LED HAL模块的实力程序为例。 本程序一共包含四个文件color_picker.png color_range.png index.html main.py。其中前面两个文件为图片,index.html为HTML网页文件,main.py为脚本程序。 main.py:003 | from bottle import get,request, route, run, static_file,template |
004 | import time, threading |
005 | from neopixel import * |
016 | strip = Adafruit_NeoPixel(LED_COUNT, LED_PIN, LED_FREQ_HZ, LED_DMA, LED_INVERT, LED_BRIGHTNESS) |
027 | global rgb, light_type |
029 | light_type = 'static' |
030 | return static_file('index.html', './') |
034 | def server_static(filename): |
035 | return static_file(filename, root='./') |
038 | @route('/rgb', method='POST') |
040 | red = request.POST.get('red') |
041 | green = request.POST.get('green') |
042 | blue = request.POST.get('blue') |
047 | if 0 <= red <= 255 and 0 <= green <= 255 and 0 <= blue <= 255: |
049 | rgb = (red<<8) | (green<<16) | blue |
052 | @route('/lightType', method='POST') |
055 | light_type = request.POST.get('type') |
056 | print("lightType="+light_type) |
060 | global rgb, light_type |
061 | flashTime = [0.3, 0.2, 0.1, 0.05, 0.05, 0.1, 0.2, 0.5, 0.2] |
063 | f = lambda x: (-1/10000.0)*x*x + (1/50.0)*x |
066 | if light_type == 'static': |
067 | for i in range(0,strip.numPixels()): |
068 | strip.setPixelColor(i, rgb) |
071 | elif light_type == 'breath': |
072 | red = int(((rgb & 0x00ff00)>>8) * f(x)) |
073 | green = int(((rgb & 0xff0000) >> 16) * f(x)) |
074 | blue = int((rgb & 0x0000ff) * f(x)) |
075 | _rgb = int((red << 8) | (green << 16) | blue) |
076 | for i in range(0,strip.numPixels()): |
077 | strip.setPixelColor(i, _rgb) |
083 | elif light_type == 'flash': |
084 | for i in range(0,strip.numPixels()): |
085 | strip.setPixelColor(i, rgb) |
087 | time.sleep(flashTime[flashTimeIndex]) |
088 | for i in range(0,strip.numPixels()): |
089 | strip.setPixelColor(i, 0) |
091 | time.sleep(flashTime[flashTimeIndex]) |
093 | if flashTimeIndex >= len(flashTime): |
098 | t = threading.Thread(target = lightLoop) |
103 | run(host="0.0.0.0", port=8000) |
@get("/"), 这作用是创建一个网页静态文件传输通道。流浪器访问时会打开目录下的index,html文件, @route('/<filename>') 这个是用来传输静态文件,两张图片的。 @route('/rgb', method='POST'),@route('/lightType', method='POST')是创建两个URL,分别用来传输RGB的值,和灯控制类型的。 获取到值是分别储存在reg,green,blue和light_type 中。 threading.Thread另外创建一个python线程,执行lightLoop()函数,实时处RGB LED的状态。RGB LED有静态显示,闪烁显示已经呼吸灯显示三种显示方式。 index.html代码:04 | <meta charset="utf-8"> |
06 | <meta name="viewport" content="width=device-width, initial-scale=1.0, user-scalable=no"> |
07 | <title>web rgb</title> |
08 | <script src="http://code.jquery.com/jquery.js"></script> |
09 | <style type="text/css"> |
10 | body,div,img{ border:0; margin:0; padding:0;} |
15 | <div style="width:100%; height:40px; line-height:40px; text-align:center; font-size:20px; color:white; background-color:blue; margin:auto"> |
16 | Controlling RGB LED with the web |
18 | <img width="300" height="300" src="color_range.png" id="myimg" style="display:none" alt="range"/> |
20 | <div style="width:300px; height:300px; position:relative; text-align:center; margin:auto; margin-top:20px; margin-bottom:40px;" id="colorRange"> |
22 | <canvas id="mycanvas" width="300" height="300"> |
23 | Your browser does not support the html5 Canvas element |
26 | <img width="30" height="30" src="color_picker.png" id="picker" style="position:absolute; top:135px; left:135px;" alt="picker" /> |
29 | <div style="font-size:20px;align:center;text-align:center;margin:auto; border:1px solid gray; border-radius:10px; width:320px; height:40px; line-height:40px;"> |
31 | <input type="radio" name="radio1" value="static" checked/>static |
32 | <input type="radio" name="radio1" value="breath"/>breath |
33 | <input type="radio" name="radio1" value="flash"/>flash |
38 | var RadiusRange = 150; |
39 | var RadiusPicker = 15; |
40 | var offsetX = window.screen.width / 2 - RadiusRange; |
42 | var centerX = offsetX + RadiusRange; |
43 | var centerY = offsetY + RadiusRange; |
45 | var colorRange = $('#colorRange')[0]; |
46 | var colorPicker = $('#picker')[0]; |
47 | var myCanvas = $('#mycanvas')[0]; |
48 | var myImg = $('#myimg')[0]; |
49 | var ctx = myCanvas.getContext('2d'); |
50 | myImg.onload = function(){ctx.drawImage(myImg, 0, 0);} |
52 | colorRange.addEventListener('touchstart', touch, false); |
53 | colorRange.addEventListener('touchmove', touch, false); |
56 | var X = e.touches[0].clientX; |
57 | var Y = e.touches[0].clientY; |
60 | if(Math.sqrt(x*x + y*y) < RadiusRange-5) |
62 | colorPicker.style.left = X - offsetX - RadiusPicker +'px'; |
63 | colorPicker.style.top = Y - offsetY - RadiusPicker +'px'; |
65 | var rgba = ctx.getImageData(X-offsetX, Y-offsetY, 1, 1).data; |
67 | var green = rgba['1']; |
69 | $.post('/rgb', {red: red, green: green, blue: blue}); |
72 | event.preventDefault(); |
75 | $('input').click(function() { |
76 | var type = this.value; |
77 | $.post('/lightType', {type: type});; |
【1】 index.html文件包含<head>,<body>,<script>三部分 <head>部分中<script src="http://code.jquery.com/jquery.js"></script> 这个语句是通过网页链接引入jquery.js库文件,这个文件和上一张webiopi中的那个文件是一样的。
【2】 <body>部分是设置网页界面,包含一个网页标题,彩色图片,以及三个LED 显示类型选择按键。
【3】 <sritpt>为脚本,脚本中对touchstart事件和touchmove事件监听。这两个事件只在手机端起作用,所以在pc端访问时拖动鼠标,是不能选中颜色的。pc端相对应的事件为:onmousedown、onmousemove。 当事件触发时会调用touch()函数,获取当前的颜色并POST方式发送到/rgb。服务器端接受到传过来的数据就会触发main.py中的rgbLight()函数。 $('input').click(function() 这里是注册按键点击事件。但选择按键被按下时会触发函数,将当前的按键ID通过POST方式发送到/lightType 。从而会触发main.py中的lightType()函数。 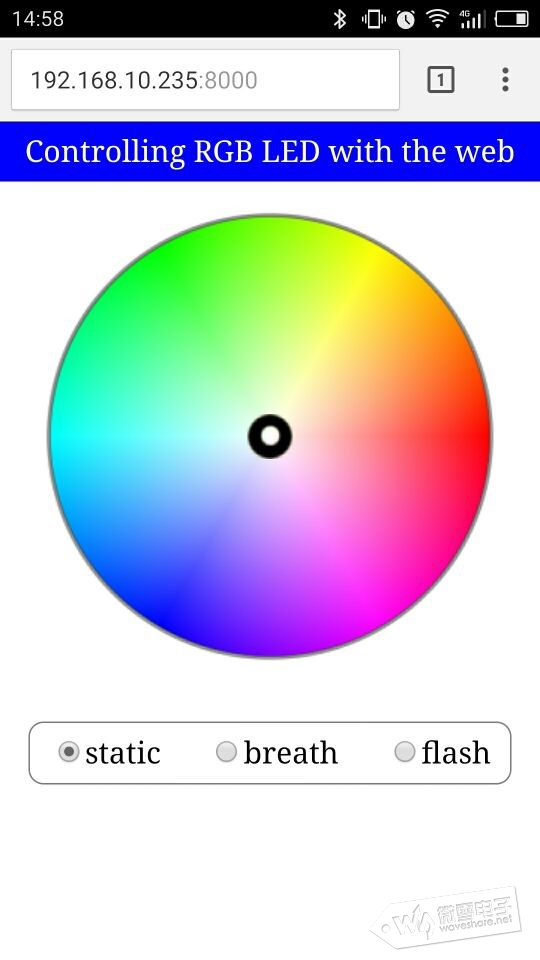
通过web控制AlphaBot2智能车 下载AlphaBot的程序,程序中web_Control目录即通过Bottle控制小车的。 工程目录下包含AlphaBot2.py,PCA9685.py,index.html,main.py四个文件。其中AlphaBot2.py为小车控制库文件,PCA9685.py这个是舵机控制库文件。主要看index.html和main.py这两个文件。 main.py代码:03 | from bottle import get,post,run,request,template |
04 | from AlphaBot import AlphaBot |
05 | from PCA9685 import PCA9685 |
15 | pwm.setServoPulse(0,HPulse) |
20 | pwm.setServoPulse(1,VPulse) |
24 | return template("index") |
29 | code = request.body.read().decode() |
35 | elif code == "forward": |
37 | elif code == "backward": |
39 | elif code == "turnleft": |
41 | elif code == "turnright": |
54 | global HPulse,VPulse,HStep,VStep,pwm |
63 | pwm.setServoPulse(0,HPulse) |
72 | pwm.setServoPulse(1,VPulse) |
75 | t = threading.Timer(0.02, timerfunc) |
78 | t = threading.Timer(0.02, timerfunc) |
82 | run(host="0.0.0.0",port="8000") |
@get("/") 创建一个创建一个网页文件传输通道,传输index.html文件。 @post("/cmd") 创建一下URL,对接受到的命令做出个中反应。其中forward,backward,turnleft,turnright,stop分别控制小车前进,后退,左转,右转,停止。up,down,left,right,控制舵机上下左右移动。 timerfunc()函数用来处理舵机转动的定时函数。 最后调用run() 函数启动服务器,并且我们设置它在 “localhost” 和 8080 端口上运行。 index.hmtl代码:04 | <meta charset="UTF-8"> |
05 | <meta name="viewport" content="width=device-width, initial-scale=1.0"> |
06 | <title>AlphaBot</title> |
07 | <link href="//cdn.bootcss.com/bootstrap/3.3.5/css/bootstrap.min.css" rel="stylesheet" media="screen"> |
08 | <script src="http://code.jquery.com/jquery.js"></script> |
12 | var isTouchDevice = "ontouchstart" in document.documentElement ? true : false; |
13 | var BUTTON_DOWN = isTouchDevice ? "touchstart" : "mousedown"; |
14 | var BUTTON_UP = isTouchDevice ? "touchend" : "mouseup"; |
16 | $("button").bind(BUTTON_DOWN,function(){ |
17 | $.post("/cmd",this.id,function(data,status){ |
21 | $("button").bind(BUTTON_UP,function(){ |
22 | $.post("/cmd","stop",function(data,status){ |
29 | <style type="text/css"> |
31 | margin: 10px 15px 10px 15px; |
36 | margin: 10px 15px 10px 15px; |
44 | <div id="container" class="container" align="center"> |
45 | <img width="320" height="240" src="http://192.168.10.130:8080/?action=stream"><br/> |
46 | <table align="center"> |
48 | <td align="center"><b>Motor Contrl</b></td> |
49 | <td align="center"><b>Servo Contrl</b></td> |
54 | <button id="forward" class="btn btn-lg btn-primary glyphicon glyphicon-circle-arrow-up"></button> |
57 | <button id='turnleft' class="btn btn-lg btn-primary glyphicon glyphicon-circle-arrow-left"></button> |
58 | <button id='turnright' class="btn btn-lg btn-primary glyphicon glyphicon-circle-arrow-right"></button> |
61 | <button id='backward' class="btn btn-lg btn-primary glyphicon glyphicon-circle-arrow-down"></button> |
66 | <button id="up" class="btn btn-lg btn-primary glyphicon glyphicon-circle-arrow-up"></button> |
69 | <button id='left' class="btn btn-lg btn-primary glyphicon glyphicon-circle-arrow-left"></button> |
71 | <button id='right' class="btn btn-lg btn-primary glyphicon glyphicon-circle-arrow-right"></button> |
74 | <button id='down' class="btn btn-lg btn-primary glyphicon glyphicon-circle-arrow-down"></button> |
79 | <input type="range" min="0.0" max="100.0", style="width:300px";> |
分析:
头文件中通过网页链接引入一个css样式文件,以及jquery.js文件。
脚本中首先判断是移动端还是PC端。如果是移动端则注册"touchstart",“touchend”事件,如果是PC端则注册“mousedown”,mouseup事件。
当按键按下时,发送按键的id号到/cmd。当按键释放时,发送停止命令“stop”到/cmd。
网页主体中通过引入mjpgs-streamer的链接引入视频窗口。设置图像大小为高240,宽320。
<img width="320" height="240" src="http://192.168.10.130:8080/?action=stream">
此ip地址以及端口号须改为树莓派实际的ip地址和端口号。
|

